Setting Up a Kubernetes Cluster with Let's Encrypt
This tutorial outlines how to setup a Kubernetes cluster on Digital Ocean, and how to deploy and secure a website on that cluster with Ingress-NGINX and Let’s Encrypt.
- Prerequisites
- Create a Kubernetes Cluster
- Connect to the Cluster
- Verify Connection
- Install Ingress-NGINX Controller
- Configure DNS
- Install Cert Manager
- Configure a Certificate Issuer
- Provide Access to your Container Registry
- Configure and Deploy Your Website
- Finishing Up
- Additional Resources
Prerequisites
- Digital Ocean account
- If you do not already have a Digital Ocean account, you can sign up with this link to get a $200, 60-day credit.
kubectlcommand line tool- This is how we will communicate with our Kubernetes cluster. If you have Docker Desktop installed, this tool comes bundled with it and you should be all set.
helmcommand line tool
Create a Kubernetes Cluster
We will be using Digital Ocean’s Kubernetes service (DOKS) which fully manages the Kubernetes control plane and container infrastructure for us.
To create a new cluster, from within the Digital Ocean dashboard click on Create and then select Kubernetes.
Choose the datacenter region where you want this hosted, and update the cluster capacity to have at least 2 nodes. Everything else you should be able to use the defaults.
After you click Create Cluster it will take a few minutes for everything to be provisioned.
Connect to the Cluster
We will be using the doctl command line tool provided by Digital Ocean to configure access to our cluster. Follow the instructions here to install and configure doctl.
After you have the doctl tool installed and the cluster has finished provisioning, you should see a command on the cluster page similar to the following:
doctl kubernetes cluster kubeconfig save <cluster-id>
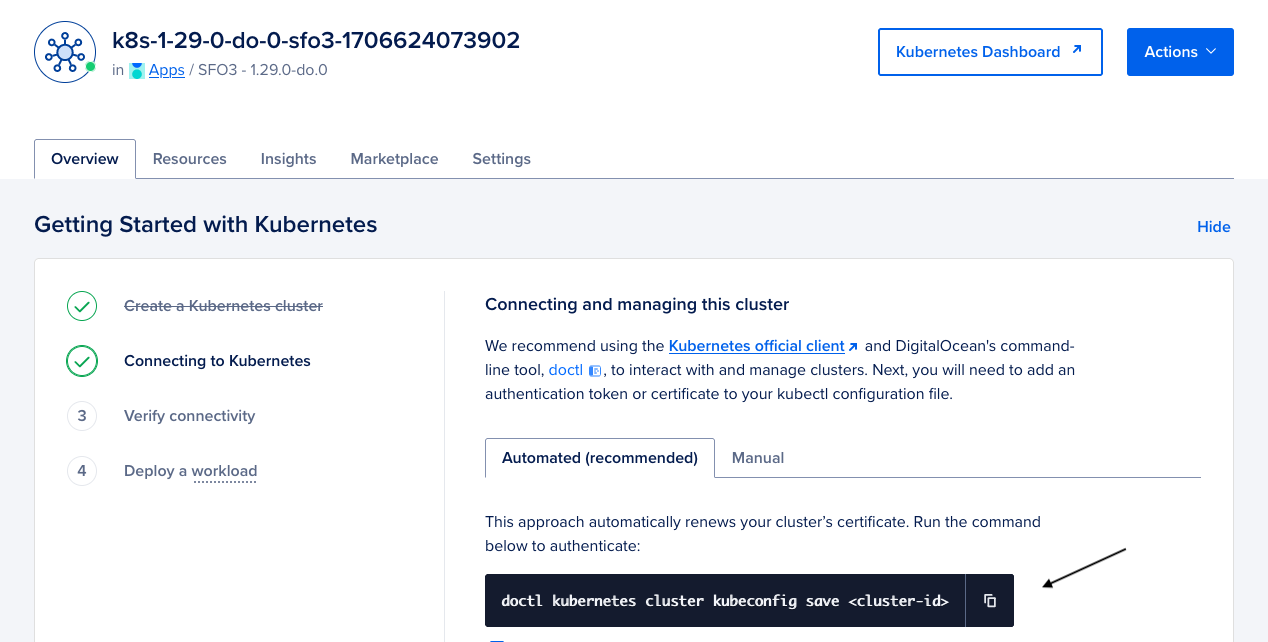
This command will update your kubeconfig file with the new cluster credentials and set it as the current context. Go ahead and run the command.
A confirmation should be output notifying you that your kubeconfig has been updated and that the current context has been changed to the new cluster:
Notice: Adding cluster credentials to kubeconfig file found in "/Users/<username>/.kube/config"
Notice: Setting current-context to do-sfo3-k8s-1-29-0-do-0-sfo3
Verify Connection
You should now be able to connect to the cluster with the kubectl command. To verify this, run the following to get the available nodes in the cluster:
kubectl get nodes
This should output each of the nodes in your node pool:
NAME STATUS ROLES AGE VERSION
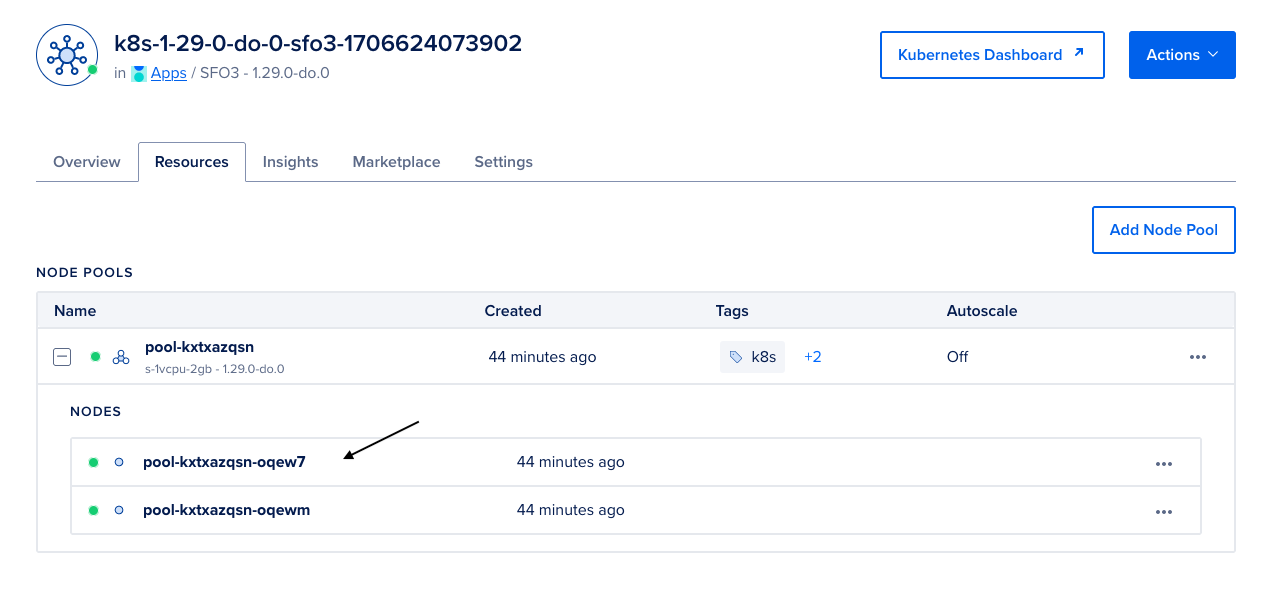
pool-kxtxazqsn-oqew7 Ready <none> 38m v1.29.0
pool-kxtxazqsn-oqewm Ready <none> 38m v1.29.0
The node names should match what is available in your resources tab on the cluster page:
Install Ingress-NGINX Controller
Next we will need to setup an ingress controller to manage routing the correct domain requests to the right services.
For our setup we will be using ingress-nginx, which is an ingress controller based on NGINX, managed by the Kubernetes community.
We will be using Helm to install this controller on our cluster. See here if you have not set this up yet.
First we want to add the helm repo where the ingress-nginx chart is hosted:
helm repo add kubernetes-ingress-nginx https://kubernetes.github.io/ingress-nginx --force-update
helm repo update
Next we want to search for the ingress-nginx package to identify the latest version:
helm search repo ingress-nginx
This should produce an output similar to this:
NAME                                  	CHART VERSION	APP VERSION	DESCRIPTION
kubernetes-ingress-nginx/ingress-nginx	4.10.0       	1.10.0     	Ingress controller for Kubernetes using NGINX a...
The package name and the chart version is what we are looking for, in this case it is kubernetes-ingress-nginx/ingress-nginx and 4.10.0. Take note of these values, we will be using them in the install command shortly.
Before we install the ingress controller we need to customize some configuration values. Create a new ingress-nginx.yml file with the following:
# ingress-nginx.yml
---
controller:
  service:
    type: LoadBalancer
    annotations:
      # Enable proxy protocol for load balancer
      service.beta.kubernetes.io/do-loadbalancer-enable-proxy-protocol: "true"
      # Enable passing encrypted data to backend nodes from load balancer
      service.beta.kubernetes.io/do-loadbalancer-tls-passthrough: "true"
      # Assign a domain name to your load balancer (REPLACE THIS)
      service.beta.kubernetes.io/do-loadbalancer-hostname: "yourdomain.com"
  config:
    # Enable proxy protocol for NGINX
    use-proxy-protocol: "true"
When we install ingress-nginx this will also setup a Digital Ocean load balancer which will provide access to our cluster from the outside world. The proxy protocol settings pass through the client IP information to the backend services, without this everything would look to be originating from the load balancer.
The hostname setting is required for the Let’s Encrypt challenge request to be routed correctly (more details here). Replace “yourdomain.com” with the domain of the website you plan to host in the cluster.
Now we are ready to install the controller, run the following command to install the ingress-nginx package into your cluster:
helm install ingress-nginx \
  kubernetes-ingress-nginx/ingress-nginx \
  --version=4.10.0 \
  --namespace ingress-nginx \
  --create-namespace \
  -f ingress-nginx.yml
This tells helm to install chart version 4.10.0 of the kubernetes-ingress-nginx/ingress-nginx package within the ingress-nginx namespace, and to apply our ingress-nginx.yml configuration file. The first ingress-nginx param is the name of the “release” which allows us to reference this installation as a whole.
The command might take a few seconds to complete, but if successful you should see something similar to this:
NAME: ingress-nginx
LAST DEPLOYED: Tue Mar 19 08:49:51 2024
NAMESPACE: ingress-nginx
STATUS: deployed
REVISION: 1
TEST SUITE: None
NOTES:
The ingress-nginx controller has been installed.
It may take a few minutes for the load balancer IP to be available.
Configure DNS
Now that we have our ingress controller installed we need to configure a domain name to point to the new load balancer that was setup.
First check on the status of load balancer to see if the external IP is available yet:
doctl compute load-balancer list --format "ID, IP, Name, Status, Created"
The output should give you something similar to the following:
ID                                      IP                Name                                Status    Created At
743de9eb-e2bb-4a8f-bcea-af44c069740a    12.123.12.123     kbTnLcEEcXrd9B9HkbTnLcEEcXrd9B9H    active    2024-03-19T15:50:19Z
If the IP is not yet available, wait a few minutes and try again. The IP address returned is what we will use to configure our DNS.
After the IP address is available, go to your domain name registrar and add an A Record for the domain you used in the previous section. If you are unfamiliar with this, here are some instructions using Namecheap, the process should be very similar for other registrars.
Install Cert Manager
cert-manager is a x.509 certificate controller for Kubernetes that once configured will completely manage obtaining and renewing SSL/TLS certificates for your websites hosted in the cluster. The controller supports a number of certificate issuers but in this tutorial we will be using Let’s Encrypt.
We again will be using Helm for the install.
First we want to add the helm repo where the cert-manager chart is hosted:
helm repo add jetstack https://charts.jetstack.io --force-update
helm repo update
Next we want to search for the cert-manager package to identify the latest version:
helm search repo cert-manager
This should produce an output similar to this:
NAME                                   	CHART VERSION	APP VERSION	DESCRIPTION
jetstack/cert-manager                  	v1.14.4      	v1.14.4    	A Helm chart for cert-manager
jetstack/cert-manager-approver-policy  	v0.13.0      	v0.13.0    	approver-policy is a CertificateRequest approve...
jetstack/cert-manager-csi-driver       	v0.7.1       	v0.7.1     	cert-manager csi-driver enables issuing secretl...
jetstack/cert-manager-csi-driver-spiffe	v0.5.0       	v0.5.0     	csi-driver-spiffe is a Kubernetes CSI plugin wh...
jetstack/cert-manager-google-cas-issuer	v0.8.0       	v0.8.0     	A Helm chart for jetstack/google-cas-issuer
jetstack/cert-manager-istio-csr        	v0.8.1       	v0.8.1     	istio-csr enables the use of cert-manager for i...
jetstack/cert-manager-trust            	v0.2.1       	v0.2.0     	DEPRECATED: The old name for trust-manager. Use...
jetstack/trust-manager                 	v0.9.1       	v0.9.1     	trust-manager is the easiest way to manage TLS ...
The jetstack/cert-manager package is the one we are looking for, the chart version in this case is v.1.14.4.
Using these values run the following command to install the jetstack/cert-manager package into your cluster:
helm install cert-manager \
  jetstack/cert-manager \
  --namespace cert-manager \
  --create-namespace \
  --version v1.14.4 \
  --set installCRDs=true
This tells helm to install chart version v.1.14.4 of the jetstack/cert-manager package within the cert-manager namespace, and to install the required CRDs (custom resource definitions). The first cert-manager param is the name of the “release” which allows us to reference this installation as a whole.
The command might take a few seconds to complete, but if successful you should see something similar to this:
NAME: cert-manager
LAST DEPLOYED: Tue Mar 19 08:54:36 2024
NAMESPACE: cert-manager
STATUS: deployed
REVISION: 1
TEST SUITE: None
NOTES:
cert-manager v1.14.4 has been deployed successfully!
Configure a Certificate Issuer
Now that cert-manager is installed we need to create a ClusterIssuer resource to configure which certificate authority (CA) we plan to use for certificate signing requests (in our case Let’s Encrypt).
Create a new cluster-issuer.yml file with the following:
# cluster-issuer.yml
---
apiVersion: cert-manager.io/v1
kind: ClusterIssuer
metadata:
  name: letsencrypt-production
spec:
  # ACME issuer configuration
  # email - the email address to be associated with the ACME account (make sure it's a valid one)
  # server - the URL used to access the ACME server’s directory endpoint
  # privateKeySecretRef - Kubernetes Secret to store the automatically generated ACME account private key
  acme:
    email: name@yourdomain.com # REPLACE THIS
    server: https://acme-v02.api.letsencrypt.org/directory
    privateKeySecretRef:
      name: letsencrypt-production-private-key
    solvers:
    - http01:
        ingress:
          ingressClassName: nginx
This will configure a new cluster issuer using the Let’s Encrypt ACME server, and specifies to use the http01 solver, which will generate a key on your domain that Let’s Encrypt will then verify to prove that you own the domain.
Update the email field with a valid email to register with Let’s Encrypt.
With the file updated, run the following command to create this resource on your cluster:
kubectl apply -f cluster-issuer.yml
To verify the cluster issuer is ready run the following command:
kubectl get clusterissuer
If all is well you should see something like the following:
NAME                     READY   AGE
letsencrypt-production   True    60s
Provide Access to your Container Registry
Note: If the container image for your website is public you can skip this section.
Before we deploy our website we need to provide our cluster with access to our private container registry so it can pull the image referenced in the deployment.
We will be using Docker Hub for this example, but the process is the same for other container registries.
From within your Docker Hub account navigate to the security section of your account settings and create a new read-only access token.
Using that access token create a new docker-registry secret within your cluster with the following command:
kubectl create secret docker-registry docker-hub-creds \
  --docker-server=docker.io \
  --docker-username=<username> \
  --docker-password=<access-token> \
  --docker-email=<email>
This command creates a new secret of the docker-registry type that can be used for accessing a container registry. In this case we are naming the secret docker-hub-creds.
The --docker-server flag specifies the container registry server to use. Use docker.io for Docker Hub.
Replace <username> and <email> with your Docker Hub username and email, and replace <access-token> with the access token we just created.
Run the command with the updated values, you should see the following output:
secret/docker-hub-creds created
Note: This command will be saved in your shell history with the credentials plain to see. If this is a problem you can manually edit your history file to remove it.
Configure and Deploy Your Website
Now that everything is setup we can deploy our website into our cluster.
Configure
Create a new yourdomain.yml file with the following:
# yourdomain.yml
---
apiVersion: apps/v1
kind: Deployment
metadata:
  name: yourdomain-deployment
spec:
  replicas: 3
  selector:
    matchLabels:
      project: yourdomain
  template:
    metadata:
      labels:
        project: yourdomain
    spec:
      containers:
      - name: yourdomain-pod
        image: docker.io/jmalloc/echo-server
        imagePullPolicy: Always
        ports:
        - containerPort: 8080
      imagePullSecrets:
      - name: docker-hub-creds
---
apiVersion: v1
kind: Service
metadata:
  name: yourdomain-service
spec:
  selector:
    project: yourdomain
  ports:
  - port: 80
    targetPort: 8080
---
apiVersion: networking.k8s.io/v1
kind: Ingress
metadata:
  name: yourdomain-ingress
  annotations:
    cert-manager.io/cluster-issuer: letsencrypt-production
spec:
  ingressClassName: nginx
  tls:
  - hosts:
    - yourdomain.com
    secretName: yourdomain-cert
  rules:
  - host: yourdomain.com
    http:
      paths:
      - path: /
        pathType: Prefix
        backend:
          service:
            name: yourdomain-service
            port:
              number: 80
This configuration is actually 3 kubernetes manifests in 1, each of the manifests beginning with a ---. There is a Deployment resource, a Service resource, and an Ingress resource.
We will take a look at the key fields for each to understand what is going on.
Deployment
First we name the Deployment based on our website name:
metadata:
  name: yourdomain-deployment
Next we declare that we want 3 replicas of the “pod” matching the project label of “yourdomain”, this will spin up 3 instances of our website:
  replicas: 3
  selector:
    matchLabels:
      project: yourdomain
And then we provide the pod template for the container we want to run and assign it the project label of “yourdomain” :
  template:
    metadata:
      labels:
        project: yourdomain
    spec:
      containers:
      - name: yourdomain-pod
        image: docker.io/jmalloc/echo-server
        imagePullPolicy: Always
        ports:
        - containerPort: 8080
      imagePullSecrets:
      - name: docker-hub-creds
We specify our container image with the image key, identify the container port that the image is listening on with the ports key, and then provide our Docker Hub credentials with the imagePullSecrets key using the secret key name we created earlier (only needed for private container registries).
Service
Next we configure a Service to provide a singular, stable network interface to connect with our pods we just configured in the Deployment. This makes it so no matter how many instances of our site we have running they are all accessible through this singular service.
We first provide a name for the service based on our website name:
metadata:
  name: yourdomain-service
Then we configure our service to listen on port 80 and to route requests to port 8080 to pods having the project label of “yourdomain”:
spec:
  selector:
    project: yourdomain
  ports:
  - port: 80
    targetPort: 8080
Port 8080 is the containerPort we defined in the Deployment configuration.
Ingress
Finally we define an Ingress resource to map our domain to the service we just configured, and to request a SSL/TLS certificate from Let’s Encrypt.
We first provide a name for the ingress resource based on our website name:
metadata:
  name: yourdomain-ingress
Next we add an annotation letting cert-manager know we want it to request a certificate for this resource using the the letsencrypt-production issuer we created earlier.
  annotations:
    cert-manager.io/cluster-issuer: letsencrypt-production
Next we configure a tls section to enable HTTPS for our domain and specify a secret name where the TLS certificate will be stored. cert-manager will populate this secret after the certificate request is approved:
  tls:
  - hosts:
    - yourdomain.com
    secretName: yourdomain-cert
Then finally we configure our routing rules to map our domain to the yourdomain-service we defined in the Service configuration.
  rules:
  - host: yourdomain.com
    http:
      paths:
      - path: /
        pathType: Prefix
        backend:
          service:
            name: yourdomain-service
            port:
              number: 80
The path and pathType configuration is saying to match any path for the host specified that starts with “/” and route it to port 80 of the yourdomain-service.
Port 80 is the port we defined in the Service configuration.
Install
After you have updated the deployment image key and have replaced “yourdomain” with the actual domain you plan to use to host your site, we are ready to deploy our website.
Run the following command to install the Deployment, Service and Ingress resources into your cluster:
kubectl apply -f yourdomain.yml
This should output something similar to the following:
deployment.apps/yourdomain-deployment created
service/yourdomain-service created
ingress.networking.k8s.io/yourdomain-ingress created
Verify Installation
To verify everything was configured correctly and is working as expected run the following command:
kubectl get deployments,services,ingresses,certificaterequest
This should produce an output similar to the following:
NAME                                    READY   UP-TO-DATE   AVAILABLE   AGE
deployment.apps/yourdomain-deployment   3/3     3            3           4m6s

NAME                         TYPE        CLUSTER-IP    EXTERNAL-IP   PORT(S)   AGE
service/yourdomain-service   ClusterIP   10.123.12.1   <none>        80/TCP    10m

NAME                                           CLASS   HOSTS            ADDRESS          PORTS     AGE
ingress.networking.k8s.io/yourdomain-ingress   nginx   yourdomain.com   yourdomain.com   80, 443   10m

NAME                                                   APPROVED   DENIED   READY   ISSUER                   REQUESTOR                                         AGE
certificaterequest.cert-manager.io/yourdomain-cert-1   True                True    letsencrypt-production   system:serviceaccount:cert-manager:cert-manager   10m
We can see that our deployment has 3 instances running, our service was assigned a cluster IP and is listening on port 80, our ingress is accepting requests for our domain on port 80 and 443, and that our certificate request has been approved and is ready for our domain.
If everything looks good your website should be live on your domain and accessible through HTTPS.
You can further dig into the details of each of the resources if something does not look right with the following command:
kubectl describe <name>
The name is what was output in our previous kubectl get command. For example to get more details on our certificate request we could run:
kubectl describe certificaterequest.cert-manager.io/yourdomain-cert-1
If there was an issue you can usually find details of the problem using the kubectl describe command.
Finishing Up
We now have a fully configured cluster setup with ingress-nginx for domain routing and cert-manager for managing SSL/TLS certificates.
In this tutorial we only deployed a single website, however we can very easily add additional sites to the cluster by repeating the previous section.
We just need to update our DNS for the new domain to point to the load balancer IP, and then follow the steps from the “Configure and Deploy Your Website” section with the new domain name and everything should just work.